Challengers Guide and Help Thread
Replies
How to use the guide
Those without any links in this post are the ones I'm still working on, or am not strong enough yet to beat.
When writing this guide, I try to make affordable weapon/ scroll suggestions for evenly trained pets. The purpose is to help those who have not yet owned an optimal set with expensive weapons to get some wins. For more difficult challengers, however, expensive weapons are often needed.
Please note that the weapons you own and the way you distribute stats to your pets will determine how early on you can beat an opponent. If you've got a more expensive and better set, you might get wins at a lower tier than suggested in this guide, or get more wins at certain stats. Also, the target tier in this guide indicates the point where you can get at least the first win; you might need more stats or be at a higher tier for 5 or 10 wins.
Regular Challengers
Dust Bunny
Secret Challengers
Deadly Bella
Grumpy Fish
Waradorstiltskin
Gingembromme
Nependeathicus
Insight
Mother Mallarchy
Ancient Sphinx
Xotl Prince
Cash Shop Challengers
2017
January: Sewer Beast
February: Wrole
March: C.A.P.S. Droid
April: Volitus Ventri
June: Starved Saheric Spirit
July: Jollyjaw
Event challengers
June 2017 Peka Park Food Fest: Frosting Beast
|
Yas thank you :D [edit] UPDATE APR 28: Best set updated to reflect the Ventri's Bloom Blast attack.
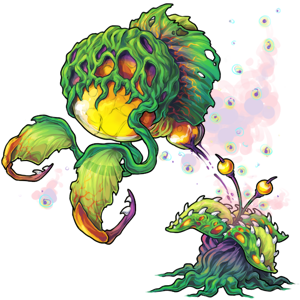
Volitus Ventri
Stats, EXP payout and weapons
Stats:
Health 350
Strength 200
Defence 150
Speed 150
EXP 600
Category: Medium
Freezing, blessing and curse are enabled. Stealing is disabled.
Estimated Target Tier: 3 (maybe high T2)
Weapons: Sharp Leaf Snag (at least 4 copies) 2-6 :dmg:physical: 2-4 :dmg:earth: 3-4 :dmg:water: 7 :block:physical: 4 :block:earth:
Activates Sneaky Spores (Curse, 1 turn): 1 :dmg:earth: 1 :dmg:light: 1 :dmg:wind: disables scrolls, allows 1 weapon
Paralysap (infinite number) 2 :dmg:earth: 2-3 :dmg:light: 2-4 :dmg:water: 3 :block:physical: 3 :block:earth: 3 :block:wind: Heals 25HP High freeze chance Once per battle
Bloom Blast (infinite number) 5-6 :dmg:earth: 4-6 :dmg:wind: 5-6 :dmg:light: Once per battle
Attack breakdown: Main icons are :dmg:physical: and :dmg:earth: Try to choose weapons that provide some defence against these icons. Defence breakdown: Main defence are :block:physical:, :block:earth: and :block:wind: Try to avoid weapons that deal these icons.
Strategy
For T4+ pets, the most effective and quickest way to beat this challenger is to freeze + attacker/bomb first turn, then keep using bombs. You'll want to heal when necessary since you might be frozen at a critical moment (esp. T4 pets). If the curse activates and you're allowed to use only one weapon, either pick heal or bomb as you see fit.
T2-T3 pets without high-end healing scrolls or battle items might want to use an infinite attacker with some defence against the Ventri's icons (physical and earth/ water), and pair it with freezer, healers and bombs throughout the battle. You'd want to freeze the Ventri first turn. Some suggestions include: (T3) (T4) (Battle Shop) or (T2) (T2) or (T2) *the last two are single use only When the Ventri is frozen, try to get your blessing up by using the (recommended) (T3) or (T3) for some earth :block:earth: and wind :block:wind: (Apollonia) or physical :block:physical: (Porin) defence. For the rest of the battle, use attacker + bomb + blocking scroll when you're not affected by the curse. If the curse activates, pick a healing or blocking item if your health is low (the Ventri's attack can range from 50-ish to 100-ish damage, to give you an idea of when to use a heal) or pick an attacker with defence. If the Ventri is near dead, you can drop the attacker for a bomb instead.
You'll also want to equip at least a scroll to your pet. Scrolls can be equipped depending on your pet's AP, which is gained through reading books and using intel boosters. You can view the amount of your pet's AP by visiting the pet page, click on the dropdown menu for your pet and select 'Scroll'. I'll try to make some cheap recommendations in the next spoiler.
Suggested weapons
Note: This list is not comprehensive. These are just a few of those available on site. You might have some of these from quest loot so feel free to Account Search them before making a purchase.
Suggested weapon set: First, to prevent yourself from being frozen, try modify all of your weapons (with at least 1 available slot) with a from the battle shop. It prevents freezing and adds extra defence (blocking 2 of each icon type). You can see if your weapons have any slots by visiting your Armory from the Battle Coliseum page, then scroll down to the weapon list.
Tier 3 (best set, probably): Past win 5, you might want to replace one of the bombs for or instead, since the Ventri can outlast the bombs you've got, unless you're in T5+
These items are interchangeable (having either in your set is fine:
Cheaper alternatives for the Welldweller Gauntlets: The Earth Soul Stone is less preferable than the other two, since it's semi-breakable.
Suggested Scroll: Best defensive option for low-tiered pets (probably):
Cheaper alternatives (one of these is fine; in no particular order):
Suggested attacking scrolls (For when the Ventri is frozen and you are allowed to use scrolls; most of them are useless otherwise though. Fill your unused AP with these after you have equipped a defensive scroll)
Note: The Molten Boulder is once per battle only. The Thunderous Roar has 8% heal with it, also once per battle.
All those Dark potions (dark fire, dark magma, dark water, dark light) are optional, though recommendable for T2-T3 pets. Avoid dark earth potions though, since the Ventri blocks its attack.
Other bomb suggestions
Notice something missing/ inaccurate? Please help by pinging me so that I can correct it 😄
|
When I battled for the first time (just playing defense to log her weapon's icons), I noticed that she has at least 7 Paralysap :/ Probably more but I lost count LOL
Volitus Ventri has another attack: Bloom Blast (OPB), that deals 5 - 6 Earth, 4 - 6 Wind, 5 - 6 Light. I am not sure how many copies it has though.
 ❤
❤🎉 | | | 🎉
Oh thank you so much for the additional info. I was breezing through it so the Bloom blast never showed up :D I'll add those to the list :D
|
of course, happy to help :) I'm trying to do the first fights against easy-very hard challengers that I can't find data on as defensive as possible in order to get most of their attacks and see if the icons are in a range of numbers or do x or x or x amount of damage :P
Actually, just went a bit more thorough though the icons, Paralysap also does 2 earth.
❤🎉 | | | 🎉
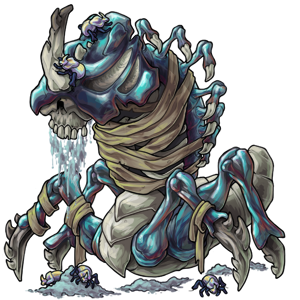
Starved Saheric Spirit
Stats, EXP payout and weapons
Stats:
Health 8924
Strength 2973
Defence 3465
Speed 3257
EXP 3000
Category: Extremely Hard/ Impossible
which means the opponent has a chance to drop either EH or Impossible tokens
Freezing, stealing and healing are disabled. Curses and blessings are enabled.
Estimated Target Tier: 11
Weapons: Wretched Wrap 20 :block:physical: 20 :block:light: 20 :block🔥 20 :block:earth: 20 :block:dark: 20 :block:wind:
Viscous Vomit 10-13 :dmg:dark: 4-5 :dmg🧊 3-5 :dmg:light: 8-10 :dmg:water: 10 :block:physical: 10 :block:dark: 10 :block:earth: 10 :block:wind:
Beetle Bites 4-10 :dmg:physical: 8-11 :dmg🔥 4-12 :dmg:dark: 6-10 :dmg:earth: 5-9 :dmg:magma: 4 :block:physical: 5 :block🔥 4 :block:dark: 5-6 :block:earth: 4 :block:light: 4-5 :block:magma: 6 :block:wind:
Skeletal Stab 18-24 :dmg:physical: 9 :dmg:earth: 9 :dmg:magma: 10-14 :dmg:wind: Boosts strength by 100 each use
Attack breakdown: Main icons are :dmg:physical:, :dmg:dark: and :dmg:earth: Try to choose weapons that provide some defence against these icons. Defence breakdown: Weak to :dmg:water: water, :dmg🧊 ice and :dmg:magma: magma. Try to pick weapons that deal these icons.
Strategy
Suitable for T11 pets, preferably with around 2,500 in Defence and Health. The higher these stats are, the better. By wins 8-10, it might take a pet with 3,000 HP to pull a win. Lack in defence, attack and speed can be made up for by using the Volatile Energized Mecha
at the beginning of the battle.
At the beginning of the battle, you might want to blast either the Spirit's Wretched Wrap or Skeletal Stab, as the former will hinder your damage dealt and the latter will hurt you due to its heavy physical and wind damage. It is recommended that you use a good blocker for defence when blasting. My first choice would be blaster + full block in the same turn; however if you have a decent shield such as the Blackmoons War Plate you can use blaster + shield + infinite blocking/attacking scroll such as the Aftershocks .
Since the Spirit does not allow healing, good defence is of utmost importance to your survivability, especially if you're at the lower end of T11. You should worry first and foremost about blocking physical and dark, while trying to take care of as many of other icons as possible (preferably :dmg:water: water, :dmg:earth: earth and :dmg:wind: wind). Therefore, weapons with spread-out defence such as or are highly recommended, besides a good physical-blocking weapon as your primary attacker. If you can tank the spirit's hits (reads: high health), you can pair your primary attacker with a heavy water or ice attacker such as or plus a defensive scroll in the same turn. Cobalt Eternals make for the best defensive scroll options since they block 4 of the Spirit's common icons, including its physical and dark biases.
However, if you run out of Cobalts or are less confident about your ability to tank hits, using your primary attacker + shield such as Blackmoons War Plate plus infinite defensive scroll is the safest approach (better still if you've got around 2,750 Defence and around that much health).
Suggested weapons
Note: This list is not comprehensive. Higher tiered pets might find winning easier with other options as well.
Suggested weapon set: First, try to slot any available slots in your weapons with either defence or regular baguette crystals (either physical, dark, or water, but the first two are more recommended if you don't have the fund for solid physical blocks). If your weapons are already slotted, replace any cheap mods (Blessing of Natural Armor Tear Crystal or Critical Strike Tear Crystal) with these.
Recommended blasters and full blocks: Other full-blocking options: It is recommended that you keep at least 02 full blocks on you at all times (including the Negating Pylonic or scroll).
Recommended primary attackers: or Other physical blocking options: or the former is preferable since it comes with heal that might prove helpful in other occasions plus it is cheaper. You might want to slot water/ ice baguette crystals on it for water/ ice damage, though.
Recommended secondary attackers: (T11) (T10) (T10) in that order. PBB is best for its defence, water attack and blessing, which offers even more spread-out defence. Maligtant Rift Staff is up next for its magma + water attack and curse. or one of the following: (probably in that order) if you use Cobalt for backup defence in the same turn.
Recommended infinite shield and booster:
For extra damage and defence: though water potions are more recommended.
Suggested Scrolls: Infinite scroll(s), probably in the following order: You need only one of these.
Then fill every available slots in your scroll set with as many Cobalt Eternals as your sP and pet's AP can afford.
Notice something missing/ inaccurate? Please help by pinging me so that I can correct it 😄
Could someone please post after me so that I can reserve the next one for the next challenger? 😄 Thank you ❤
|
Hi ! Thanks for the guide and the suggested set to use against the Saheric Spirit!
You have defeated Starved Saheric Spirit 1 time!
You won a(n) Extremely Hard token to use in the battle shop!
Won the battle with 600 HP leftover... I am unsure If I'll be able to reach 5 wins, but there's only one way to find out :D
❤🎉 | | | 🎉
Oh looks like my gut feeling is right. It's indeed both impossible and EH and gives out both types of tokens. Thank you for the confirmation, I'll edit the guide accordingly :D. If you notice any other things that need correcting or modifying, please let me know too 😄
Best of luck getting more wins! I think for non-healing opponents blasting my help a little if we can get rid of their blocks or heavier attackers.
If you don't mind, could you please post another post after this one of mine? 😅 I'd love to reserve the next post for next month's challenger. I'm so sorry for the inconvenience.
|
I got massacred the few times I tried :P I need to get my hands on another blaster, haha!
This is the firs time I hear about a challenger giving out TWO DIFFERENT tokens :o This means he's got two legs on each category?
Oh and it's no inconvenience at all ^_^
❤🎉 | | | 🎉
Yes, at least he and GE are two opponents I know that give out both EH and Impossible tokens. Sophie might too, but I'm not 100% sure about her. It's been quite a while since I last beat her so I don't remember very clearly.
If you've got only one blaster then maybe trying to get rid of one of his Skeletal Stab might help. He can be quite brutal with that plus his high attack :'(
I've got to inconvenience you again 😂 Thank you so much for helping me reserve the next post :D
|
I never really noticed with Prodigy or Sophie... I've only beaten her once or twice, and I don't think I've beaten Prodigy yet :P I might have won my first battle by blasting the Skeletal Stab... I didn't really check LOL
❤🎉 | | | 🎉
Frosting Beast
Unlocked randomly (?) by throwing an item from Food Market/ Candy Shack into the Community Cake Mix during Peka Park Food Fest June 2017. Found under Event tab in the Battle Coliseum.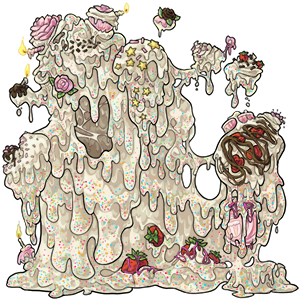
Stats, EXP payout and weapons
Stats:
Health 545
Strength 350
Defence 300
Speed 375
EXP 550
Category: Hard
Freezing, healing, stealing, curses and blessings are all enabled.
Estimated Target Tier: high T3/T4
Weapons: Freaky Frosting 4-8 :dmg:physical: 5-7 :dmg:earth: 8-10 :dmg:light: 5 :block:wind: Boost your pet's strength by 10 each use. No you don't read it wrong 😂
Gloopy Glomp 3-5 :dmg:physical: 4 :dmg🔥 3-5 :dmg:earth: 1-3 :dmg:light: 4 :dmg:magma: 2 :block🔥 2 :block:earth: 2 :block🧊 2 :block:light:
Wicked Wax 4 :dmg:physical: 5-7 :dmg🔥 5-6 :dmg:light: Chance to freeze
Attack breakdown: Main icons are :dmg:physical:, :dmg:light:, :dmg🔥 and :dmg:earth: Try to choose weapons that provide some defence against these icons. Defence breakdown: Blocks a good chunk of :dmg:wind: wind icons (for smaller pets). Weak to :dmg:water: water, :dmg:dark: dark, :dmg:magma: magma and :dmg:physical:. Try to pick weapons that deal these icons and avoid weapons that deal :dmg:wind: wind.
Loot Regular loot: Special/ 5th win loot:
Strategy
First, you'll need to slot at least 02 BoNA crystals onto the weapons you'll be using most. This crystal will activate a blessing that keeps you from being frozen, and add some extra defence against the Frosting Beast's icons.
[item2=Blessing of Natural Armor Tear Crystal]
The beast can be beaten at least 03 times with an evenly-trained high T3 pet, even without scrolls and throwing potions. If you use scrolls/ throwing potions, it is possible to get more wins with a high-T3, or a few wins with a mid-T3.
If you are in T3/ T4, the best bet would be to try to freeze the Beast during the first turn with paired with a good block. Blocking options can be limited at T3, but I find the to be a decent blocker since it takes care of the Beast's physical, light and earth icons.
During the next turn, you will want to set up a curse/ blessing paired with a bomb that deals heavy damage. If you've got the it is perfect for this challenger, since it provides extra padding against physical, fire and magma damage and has a chance to activate a curse for extra damage. makes for a cheaper alternative, but only provides earth defence. Actually, the will be another perfect option, but don't go out of your way to buy it just for this challenger.
After your blessing is up, you will want to use an attacker that deals one or more of the following icons: water, dark, magma, and physical, while blocking some of the Beast's icons too. During the same turn that you use an attacker, having a shield up is highly recommended, especially if your pet is still small. or are both cheap to make via the Asmodeus lab and come with 2 mod slots, so you can slot more mod crystals on them.
You'll need some healing when your health runs low. The following items are recommended in your set: or Pets at T4 may find the a much better alternative; and the and
The it is also recommended if you've got it. Depending on how much health you've got left, you might want to have your shield up when you heal in the same turn.
Finally, if you want to push for those extra wins (either for the EXP or the loot), using a at the beginning of the battle might help, since it boosts your strength and defence by 100 each, providing you with better chance for a win against the FB.
Suggested weapons
Note: This list is not comprehensive. Higher tiered pets might find winning easier with other options as well.
Suggested weapon set: Tier 3
Alternatives: = = = =
Tier 4 Tier 4 can use Tier 3 set suggested above, with the following upgrade/alternative: instead of = instead of The Forj Tempered Tassets have 2 mod slots but lack light and physical defence, so you might want to slot some or on it.
Throwing potions and pylonics:
Suggested Scrolls: Please bear in mind that it is almost always much cheaper to make scrolls via the Secluded Shrine than to buy from user shops.
Depending on the weapons you pick, the following scroll suggestions will help patch up the holes in your defence. If you use the suggested T3 set in this post, you might need some extra fire/ magma defence: (+13 HP heal per turn)
If you use the suggested T4 weapons and especially the Forj Tempered Tassets, the following scrolls will provide some light defence: or physical defence:
Each of the scrolls above comes with added attack, or spread-out defence and no attack, or some benefit such as heal or low chance to freeze. I recommend looking them up in The Complete Scroll List to decide which one you prefer.
If you prefer heal over added defence (recommended for T4/ T5 pets), you can pick one of these instead:
Of course, the best scroll option for low-tier pets would be but I guess you can manage without it.
Finally, modification crystals If you've got slots left on your weapons after attaching Blessing of Natural Armor crystals, you can buy defence tear crystals for added defence. Make sure that the crystals you buy make up for the defence you're lacking after your set has been assembled. For example, the T3 set suggested here lacks fire defence, so if you're not using any fire-blocking scroll, you might want to slot any available slots with Likewise, if you use a fire-blocking scroll and want extra physical/ light defence, you can buy or instead.
Notice something missing/ inaccurate? Please help by pinging me so that I can correct it 😄
Could someone please post after me so that I can reserve the next one for the next challenger? 😄 Thank you ❤ [edit] Thank you :D
|
i am completly stuck on the EH challengers. I figured Slavam would be beatable with my T6 pet but i haven't got there yet. Any suggestions?
Yes, Slavam can be beaten with your T6 pet. I just beat him with my T6 with somewhat similar stats to yours (a little bit higher, but you've got much more AP to compensate for the lack of stats on your part).
First you can take a look at 's Guide for Slavam here to see his weapons. To save your time I used the following set this morning against him:
Slavam
The set can be tailored a bit to suit what you've got available in your armory, but I'd recommend having two clutch healers. I died a few times to crit hits before managing a win so don't lose heart if you can't get a win right away. You've got the stats so you'll get the win with some patience and luck :)
|
ah thank you! I will keep trying :D Also with the set help. As i said not much of a battler.
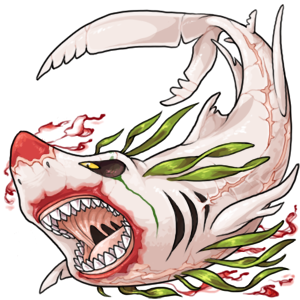
Jollyjaw
Stats, EXP payout and weapons
Stats:
Health 3000
Strength 2800
Defence 2000
Speed 1700
EXP 1350
Category: Very Hard
All features enabled except blessing.
Estimated Target Tier: High T6
Weapons: Gaping Jaws 7-9 :dmg:physical: 6 :dmg🔥 8-10 :dmg:water: 8 :block:physical: Boosts strength by 40
Shark Jump 6-11 :dmg:physical: 7-12 :dmg:water: 8 :dmg:wind:
Seaweed Strangle (has 2 copies) 7 :block:physical: 7 :block:dark: 7 :block:earth: 7 :block🧊 7 :block:water: 7 :block:wind: Heals 100 or 200 HP Chance to freeze When stolen and used by you, will damage you for 15%HP of your pet's max HP.
Raw Red Nose 9 or 10 :dmg:physical: 7 or 8 :dmg:dark: 10 :dmg:water:
Red Current Scroll 1 or 2 :dmg🔥 0-3 :dmg:water: 3 or 4 :block:water: Heals 25HP
Attack breakdown: Main icons are :dmg:water:, :dmg:physical: and :dmg🔥. Try to choose weapons that provide some defence against these icons. Defence breakdown: Weak to :dmg:light: light, :dmg🔥 fire, and :dmg:magma: magma. Try to pick weapons that deal these icons.
Strategy
Suitable for High T6/T7 pets. It is recommended that pets at T6/T7 have at least an infinite healing scroll. It is almost impossible to get a win without one.
What makes Jollyjaw difficult is that he can freeze you and heal a lot per turn with his Seaweed Strangle, potentially more than a T6 pet can damage. With blessing disabled, you cannot protect yourself against his freezing. With this in mind, Blessing of Natural Armor crystals are no good for this challenger, and Seaweed Strangles make for the top priority blasts.
After freezing him first turn, you should aim to get rid of at least 2 of his weapons (if they are both Seaweed Tangles, the better), using either double-blasting (Recycle Blaster + Soma Tablets) or stealing + blasting. If you choose the latter method, remember to steal first before blasting, or you might risk stealing the blasted weapon. The best stealer is which steals 2 items. However, you can also use instead (it has 90% chance of stealing). If you manage to steal Jollyjaw's Seaweed Strangle, using it against him might be very effective. However, to circumvent the -15% heal penalty, you might want to pair it with Reborn Icewand of Doom + a percentage healing scroll. When the shark is frozen, drop the Seaweed Strangle and use two healing weapons instead.
When it comes to strategy, I personally find chain freezing better for smaller pets. You might want to use an infinite freezer, such as:
paired with an infinite attacker which has some heal, and all the better with some freeze chance. To this end, Reborn Icewand of Doom is a very good weapon to pick up.
While you're attacking, it's always better to have your shield up while you alternate between your infinite healer and freezer. Again, will prove useful for pets at T6-T7. Make sure to switch to your healing weapon when your health is low. Don't forget clutch healers such as Phoenix Quill and Reviver of the Lion.
For scrolls, as recommended earlier you should have at least one infinite percentage healing scroll equipped. I used
If you've got spare APs, make sure to fill the rest of them with chance freezing scrolls such as which will help a lot, especially if you want to go for 5 wins.
Suggested weapons
Note: This list is not comprehensive. Higher tiered pets might find winning easier with other options as well.
Suggested weapon set: First, for mod crystals, you will find defence and curse-enabling crystals helpful. The following are cheap and can be used to slot on your shields and weapons: in that order. Each Singed Tear Crystal will add 3 icons to your weapon(s) and 5% of activating Singed curse, which does 8 icons over 5 turns that the shark cannot block.
Recommended T6-T7 sets (double-blasting approach):
Alternatives: = * (T8) (T8) (T8) **
- Takes up Freezer slot, so you can't bring a 100% freezer. ** Most effective at 1,200 Speed or more. = (T8 - highly recommended) = (T8 - highly recommended)
For blast + steal approach: ~ or
For extra damage and defence:
For extra freeze chance:
Suggested Scrolls: =
Freezing scrolls: or defensive scrolls:
Notice something missing/ inaccurate? Please help by pinging me so that I can correct it :)
Could someone please post after me so that I can reserve the next one for the next challenger? :) Thank you ❤ [edit] Thank you :)
|
-posts after - Thank you for doing this! I am lazy battler and always like to start my strategizing by looking at someone else's strategy. XD
⭐
⭐ I changed my username. I used to be Aeon. ⭐
⭐
Do you mind if I add links to your guides to my loot guide?

[font=monotype corsiva]Lost in the Darkness[/font]