☀ CW Denial / Help Thread! ☀
Replies
The part I quoted was the only note from the denail :) either way thanks! It's good to know they use overlay for the actual wearable and item for the icon, and that they are clear with explaining too ^_^
yo! sorry just a quick question but by item they mean the ci, not overlay right? just wanted to make sure asdfghjkl
alright sweet!! thank you ' v '
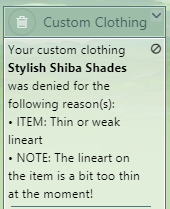
Username --- What do you need help with --- The overlay. Was there a denial --- NOTE: In addition, this overlay is looking a bit strange on darker bases at the moment!
Optional Can we take a look at the PSD files --- Yes
Hello! I'm doing some freckles and I don't why they look so strange on darker bases.
They look like this on SAI (all layers in multiply): Click me
And when I save them, in Manga Studio, they look like this D: Click Me
I tried saving them in lots of different ways, converting the layers into smart objects on Photoshop before saving on SAI, mergin all layers, changin the opacity. Nothing seems to work.
Any help would be appreciated. <3
[img align=right]https://i.imgur.com/Axtd3mF.gif[/img]
Layer effects such as multiply do not save on transparent parts of pngs where there is nothing below the layer that is set to multiply. Your file will show up as the layer looks went set to 'normal' or no effect. I recommend using a dark color with lower opacity set to 'normal' or no effect to achieve freckles that work for all skin tones.
You're my hero. <3 Thanks!!!
[img align=right]https://i.imgur.com/Axtd3mF.gif[/img]
Link to the overlay(s) --- Item Image Overlay
What do you need help with --- I'm really interested in starting up a CW shop as most of my CW have just stayed in my files collecting dust. I really enjoy making them but I lack confidence. I wanna give it a real go but I want some critique before I submit my first one. Please don't go easy on me, I want this to get approved! Please let me know if there's anything at all that I should change.
Was there a denial --- Have not submitted yet as I would like as much critique as possible before doing so.
Optional Can we take a look at the PSD files --- I made it in procreate, so if that is compatible then yes! Can we redline --- Sure.
Thank you so much in advance, any advice helps! <3
Hey there! I'm so sorry you never got a response - no one saw your post without the group ping. D: If you're still interested in feedback, I made some quick edits for you to go with some comments. ^_^
 (original on left, my edits on the right)
Overlay: Such a cute idea! I could see a whole cute outfit going with this. ^_^ You've got great lineart, good thickness around the edges and the lineart within the wig being a little thinner works well. My biggest suggestion here would be to color the lines inside the wig to match the color of the wig itself, because the thin black/gray lines inside the colored wig make the colors look muddy and gray, which is a common denial. I would also beef up the lines a little bit on the base of the "cream puffs", as they are a little indistinct. I also cleaned up the outside of the wig. This is mostly a personal preference, but the extra strands of hair make the wig look a bit messy and it becomes less easy to use on various HAs. If you like the strands though, by all means include them! I did, however, mark (in green) a couple of "bumps" that look like they are mistakes that should be removed.
CI: Perfect CI for this wig, for sure. The concept is great! Small problem - the bg on the original CI is not 100% white, so that's an easy fix. The lineart is just a teensy bit thin and pixelleted, so I would recommend using a slightly larger or softer brush when inking the CI. I would alter the "cream" on top of the brownie to look more like a swirl of hair, because one of the rules for CWs is that the CI must contain something of the overlay to be accepted - so in this case, a wig overlay needs hair in the CI. I also darkened the shadows on the right side of the brownie and re-shaded the leaves to match the same light source, which I indicated with the little sun.
My biggest recommendation, if you're not already, would be to draw at least double the size of the submission size for both the overlay and the ci, then shrink them down when you save. This makes your life so much easier when drawing, and can help prevent that jagged or pixellated look. Let me know if you have any questions, and sorry again that it took you so long to get a response! ^_^
Username ---
What do you need help with --- overlay
Was there a denial ---
OVERLAY: Anatomy or perspective issues • The perspective still isn't quite working. I suggest asking for a bit of help on the CW forums.
Thus I’m here
Can we redline --- yes plz
Here is the image file, I changed it again after received the denial, does it look ok regarding perspective? Does it match the HA now xD, tbh everytime I submit i think the shoes fit, but apparently they are not.
SPOILER (click to toggle)

Hey all! I came back to Subeta recently and noticed a few of the CW's now are "Body-mods" I was wondering if there were any guidelines for how to do this? And if it affects the pricing at all?
[tot=Mika]
Hey there, welcome back! Body mods are one of the more popular types of CWs now, especially with the new wardrobe (it's still in the testing phase, but basically it allows you to "remove" limbs).
There are no official guidelines as far as I know, but currently body mods are anything that modify the body of the HA in some way, including things like sweaters that change the arm position, shoes that change the foot position, animal ears/tails/antlers, and so on.
You can see the current pricing set up for CWs on this page, listed under Type of Item. Body mod/base edit CWs are currently in the highest price category (2500 CSC to submit).
A few examples:
Modifies limb position, but covers the HA so you do NOT have to "remove" any limbs to use them.
Note: if the HA skin is visible in the CW, some artists will choose to make that 'skin' transparent, so that it takes on the color of the HA beneath the CW. Seen above in the Warm Mug of Luminaire Eggnog. Sometimes, this isn't possible or the artist chooses to simple color in the skintone.
Modifies limb position but DOES NOT cover the original HA's limb, meaning you must 'remove' that limb in the wardrobe to use the item.
If you have any other questions, I'm happy to help! :)
Thank you so much :D I wasn't around when they had the "Remove limb" option so that opens up so many new fun opportunities!
I have another question: Are there any "Bases" To use when creating your item? I noticed the sizing guidelines, but when I try to save bases via the wardrobe it looks like it saves the "Sections" of the avatar base (IE Shoulder etc). I'm worried that if I use a Cropping tool to save then my item may be slightly off-center of the base? I tried to scrounge around the general thread that lists helpful CW threads but didn't notice any bases in those (Unless I missed it which is completely possible)
[tot=Mika]
Yeah, the remove limb option only came around recently, which is why most body mods completely cover the base. It's been really exciting seeing how people use the new options, though!
Yes, there are! You can download the male and female base to work from on this page. They are double the double the size (it's easier to draw on a larger base), so you will have to shrink them to 250px x 500px before you save the final submission files.
Many of the CW threads are out of date. Staff has said that they are working on an updated version, but for now this thread will probably be the most helpful. And of course, you're welcome to ask me more questions if you have any. ^^

So would this be a decent example? I'm just doing something basic to get the ideas for it
[tot=Mika]
Yeah, that pose looks like it would work with the new wardrobe (turning off the shoulder, arm, and hand)!
[S]Username --- Link to the overlay(s) --- Link to the CI ---
What do you need help with - making it less square..?
Was there a denial --- here
Optional Can we take a look at the PSD files --- yes Can we redline --- yes[/s]
Solving
Hey! So, since this is an item I drew, I can fix it. :p I think I'll just have to make the blue background area smaller so it fills up less of the canvas. I'll smail you!
I haven't got a denial (yet) but I'm having a brain fart moment, I'm so sorry if this is not the right place to post this! I'm kinda new and lost.
I'm trying to create a body "toner" type of item, but I can't figure out how to port it to PNG, since it doesn't support the Multiply effect. If anyone could point me in the correct direction I'd be super grateful.
Here are some images of the problem
On my art program, with layer effects:

On the submission page:


