the noob CSS saga continues (lots of questions)
Replies
Hello!! So, I've been trying to figure out pet profile coding for uuuuh around 5 years now. I know basic css/html coding so I know how stuff is supposed to work, kinda. I actively tried to create a template for my pets around 3 years ago, you can see how well that went if you check Yoongle's profile here: Yoongi It did not reach it's completion due to multiple headaches ahbdjabdad
Anyways, I created a few more pets so now I wanna try it all over again. I created a whole new layout i wanna try, which I hope will be a bit more simpler than the one from before, but it still has some elements that I struggle with, such as making stuff poof in and out, and hover stuff. I spent the whole afternoon trying to savage some coding from my failed projects but the truth is I dunno the heck I'm doing :')
tl;dr: If you guys could help me out by either telling me if there's a good visual editor for pet pages (you know, like those website builders where you add the elements in and the site decides what the coding should be), or could help me out with figuring out how do I tackle this project, as in what steps should I take to create this thing? Or linking me to specific tutorials, that'd be cool too.
Here's what I want it to look like once you open my pet's profiles: (please ignore the art I used here, it just be a bunch of placeholders)
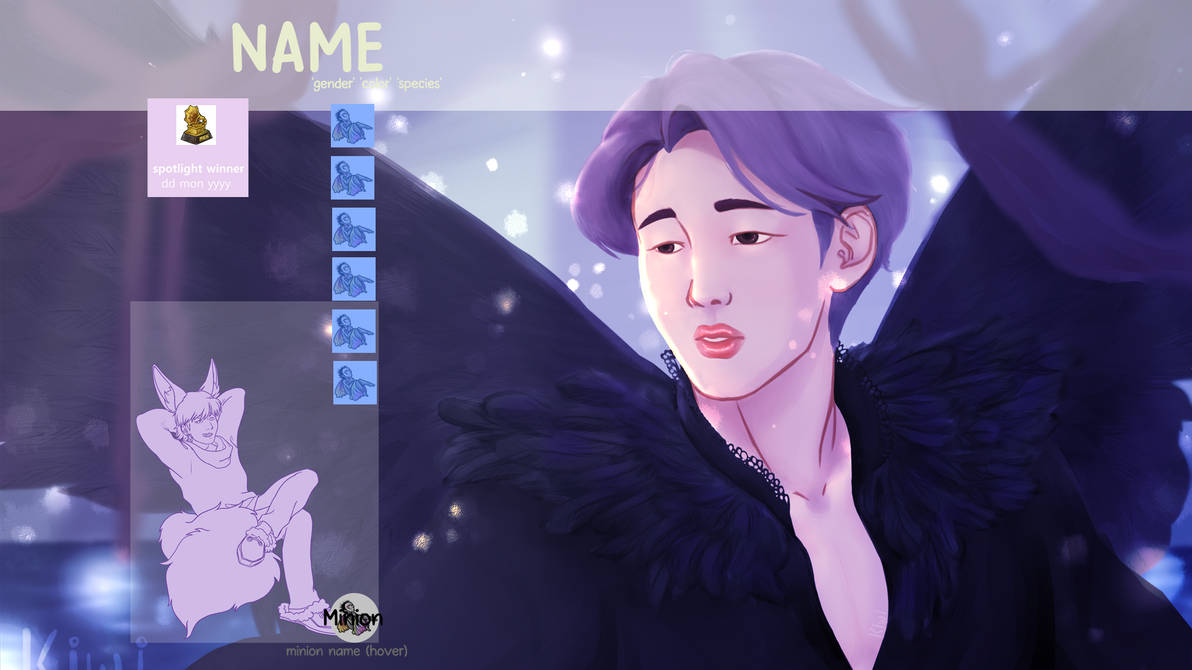
So basically, everything should be hidden with the except the minion image and spotlight section. The profile sections should appear when clicking the BLUE icons in the image. Those icons should be of subeta items, question: can I be lazy and use the item sCode to source those images or do I have to save and host them somewhere else?

This is what the page with the main container visible will look like. important details: -pet image shows up if you click the custom art and disappears if clicked again -minion text shows up on hovering the minion image text should be "minion:name the minion:species'" -the main container, how will it disappear again? it would be nice if I could make it go poof by clicking anywhere outside the area of the content box, but I dunno if that's possible in subeta pet profiles. I'm accepting suggestions here. -I'll be using bug's imported css clear code, in case that's an important info you should need to help me out akjsndkjadnad (last time I used a different one)
the rest of my sections can be seen [here] I have no idea how to reorganize the ones from already existing subeta css, and there are a few that I need to build from scratch, like the closet and the gallery, which i had already managed in my last try.
thanks in advance for any guidance you guys can give me ♥
• • • •
Okay there is a lot there I'll try to keep this short, so I'll mostly suggest how to go about the project. I can go into something or everything in more detail/explanation and should be simple to understand if desired sometime i'm not tired lol.
Anyways, First let's answer your question "can I be lazy and use the item sCode to source those images or do I have to save and host them somewhere else?" Well I wouldn't use item scode since it comes with it's own hovers/functionality, but also you don't need to host the image either just use the item image's url instead.
Okay this is by no means the best or only method but maybe it'll be a good way to go through things, may not explain something fully so please let me know if something feels missing or confusing i'll try to fix that...
Steps/Guide
(1) anything that you don't want on your profile at all add the code to remove all that.
(2) do the background image next cause you may want your elements not covering certain parts which if done later may require you to adjust placement of things which would be annoying.
(3) At this point still don't worry about hovers and other fancy things. So much bigger step is place elements where you like them to go. Good idea to break this step up a bit is to focus on static elements things that don't move or such, then do elements that are semi visible, then do where hovers will start if its a moving hover.
(4) You could do next is do the placement of any element that moves when hover like its being hovered on easier to not need to constantly test, then throw that into hover afterward. (Other way to make the hover always on though the inspect)
(5) Start adding the poofing in and out functionality
(6) Do other styling stuff like rounding corners and all that other stuff, also tweak things.
I hope this makes sense... I'm much more tired than I realized, sorry but I'll continue this later...
but before I get off this "it would be nice if I could make it go poof by clicking anywhere outside the area of the content box" should be possible to do
Hey hey! Just adding some things here since the suggestions on workflow have been summarized quite well by . When starting out with these things it is always best to work your way up from the basic layout up to the additional fluff! Also, feel free to post your current code progress if you wish for some in-depth help with it.
| Appearing and disappearing custom art From what I understood, you would like to hide/show the pet image if you click on it. A possible way of making it work with pure CSS is a bit fiddly, I think. You can use checkboxes to make certain parts of your profile show and hide. The main caveat with that approach is that you will not be able to do this with the standard since you cannot select elements that are inside of another container! The main challenge with the current profiles is that you are not able to change up the html structure itself. That means that you would have to create a custom container with your pet image that would function like a checkbox. I would actually not encourage you to do that since it usually makes everything a bit difficult to read and maintain. If you still would like to try it, I can help you with further coding. Simple hover changes are usually easier to implement and less complicated. | {
opacity: 0;
}
|
| Hovering minion That's luckily quite simple. By just setting the font-size of the element, you can remove the text and possibly add some transition to make it look more elegant. To make it so that the "Yadayada has a minion!" won't show, you can just remove the first line. | { font-size: 0; }
|
| Appearing and disappearing main content Again, very similar to your pet image problem, but less "cheaty" since you can simply define a checkbox toggle input alongside a container that you would like to hide and show. I'd use display instead of opacity, though, so the text doesn't actually get rendered making everything look off. There are some alternatives here as well. You could use a link rather than a checkbox which would display the container, when you :focus the the link. That way, it will stay displayed as long as you don't press tab or click anywhere else! I believe that there should be another possibility if you don't want to create another main_container inside your pet_desc. I believe that :focus-within would be of interest to you if you feel adventurous. | {
display: none;
}
|
But again, start out with your final layout before you started hiding and hovering stuff! That will make life a lot easier. Maybe someone else has some even better ideas. Good luck with your profile, it already is looking really promising!
 creative limbo
🌷[flower=Lyonid]
creative limbo
🌷[flower=Lyonid]You guys are absolute angels, thank you so much!!
Thank yoou!! that really helps me a lot, I'll let you know if i need any more explanations, but I got the gist of it, don't worry! hope you rested well ♥
thank you so much, I had no idea about those stuff you mentioned! Which is funny because all I've been doing is creating new containers for stuff, oops, lol
I'll be trying to tackle this project again later today and will come back with further questions! Again thank you so much, my level of frustration was getting way too high working on this without guidance, haha.
• • • •
Oh I know how you feel. This absolutely is not an easy task after all, but your progress is definitely there! Just take a step back and take it slow. I assure you, as soon as you're done, you will feel great! And feel free to hit me up if you need help! ^^
creative limbo
🌷[flower=Lyonid]So, I've been working on the profile page, and here's where I'm currently at: [pet not found] I've just added the minion code you taught me, but it's making this weird thingy where it shifts position when the hover text appears. I have idea how to fix it! x'D I also did the thing i know i shouldn't have done which is use new divs for content that already exists in subeta pages hoping i could magically make the content appear inside them afterwards, oops. I'm working on analyzing each subeta profile section to see where they should go in my code but it's gonna take a while, but I will DO IT!! my brain is a bit fried atm I also have no idea why my nav button suddenly starting doing the position shift thing after I unhid the main subeta pet profile sections x_x, am hoping that problem will go away as I work thorough those vanilla sections' css
• • • •
oh good, feel free to ping, comment, or smail me, if you need any help anytime.
EDIT: about the nav button, position shift it's caused by how target element works When a element gets targeted if the page can it'll scroll so the target element is at the top and visible, a good example of how this works is the subeta faq page, link here so if you go there click on a link just under the title "Subeta FAQ" the page scrolls to that section/element placing it at the top like I mentioned.
That is what is happening to you, even with overflow hidden on body target element will cause scrolling gives a different feeling/effect in this case but that is what is happening. From that I found it's the element , cause it goes below the bottom
okay, I think I've gotten the profile to a better place than before. I started redoing my code switching my custom divs for subeta ones, right now I only finished columns 1 and 2. [pet not found]
My two problems now are: -the viewport scaling is getting a lil wonky since there are too many elements? I was using position:absolute so I started switching some to fixed or relative to see if i could minimize the problem but it's still not good enough ;u; (i have a huge display screen and it bugs me when pet profiles are stuck to the top left part of the page and doesn't really make use of the whole space) I am working with percentage width and min-width which was what I learned for responsive designs, maybe there's something else I can do? Cause this ain't really working. it'd be nice if the whole content scaled down uniformly as if it was only one element ;u; -that minion text is still bugging me, moving the image on hover. I dunno what's the issue there ;u;
The nav is still doing the thing™ but it's cause I wanna try changing from the target system to what Lyonid suggested but I still haven't gone around to do it abdjhabdjsad I still do not understand how those checkboxes work? the whole element becomes the checkbox, in that case?
• • • •
Oh, I see, . It's honestly really difficult for me to make out the problems if I don't have your code on hand. To me it seems that you, first off, should decide what kind of positions you want to be using. Juggling relative, absolute and fixed position is a bit tricky when everything is just kinda random, haha. Just apply either just absolute positions or fixed positions to all of your containers and steadily position them to your desired place using top, left, right, bottom, margin, whatever. Everything else including that navigation comes later on. We want a clean code base, so we don't get completely overwhelmed, haha. Usually all these troubles get resolved when you conquer your code!
As for the responsiveness you are absolutely right using percentages and min-width. Do keep in mind that when working with percentages, you should know how the sizes of the parent containers look like. I tend to use vw and vh for scaling my containers because it takes the viewport width and height in account (the window size to be precise).
Let me know of your progress and if nothing helps, I can take a fresh look on it! ^^
creative limbo
🌷[flower=Lyonid]where can I share my code with you? I tried displaying it on my pet profile with the "code" sCode and html tag but that didn't work at all ahjbdjasd
• • • •
Just throw it on Pastebin ! You don't need an account, I believe, so I can just take a quick look at it. ^^
creative limbo
🌷[flower=Lyonid]i totally agree with what Lyonid said above!
I'm not sure if this will help or not, i'm really visual, but maybe it will help?
I find it's easiest to start with the very basic parts first and then add in/code things one by one as I go. It's like building something, you have to have a solid base. For a solid base it's important to pick only one kind of position since it connects everything together. kind of like if you imagined building a puppet, (lol) if you have one string moving it, you can move things easily, it all stays in place and goes where you want. if you add other kinds in other places it's going to start pulling in multiple directions and look wonky. (sections moving when they shouldn't when you add other divs kind of thing.)
The first thing I usually do is the background. Then I do my main container. If it has multiple pages then I do one div at a time, and make sure each one works before i move onto the next one.
Something I find helpful is knowing that I have to make sure that everything, no matter how small, gets it's own height/width for both before it hovers/opens/moves whatever, and after the transition. The more you can define everything the better because then you don't have to worry about it doing something it shouldn't lol.
Another thing is, tcs are fussy. If you are adjusting the subeta code you are limited in what they can do so sometimes if you are having issues with that part (not that you are) it's not a bad idea to check if what you are trying to do can even be done. You can code a tc by hand and have it do whatever you want but that does require extra work as you'd have to code each item by hand.
Props to you for learning all this :D I wish you the best of luck and I'm sure it'll turn out awesome!
[this] is where it's currently at, sorry if it looks messy lol.
Thank you so much!! What you said makes a lot of sense and yeah, I've read that the treasure chests are a pain in the butt so I don't even try to be creative about them lol. I WILL conquer the Subetan CSS! >:0000
EDIT: Updated code here I tried adding in the checkboxes you suggested but they really didn't work at all, and I have no idea how they work, actually ksnfnsdkjf. from what I understand i can't use the focus one cause my target element is not inside it??? I dunno what's going on I also encountered a problem with the closet section, the outfit sCode, can I try to edit it? otherwise I'll have to manually call for every outfit img link,, right?
• • • •
If you still want checkboxes instead here more practical code to accomplish this,
Put this part at the top of your added html not inside anything
NOTE: this allows multiple to be selected at once, but you can change that to only one at a time by changing type from "checkbox" to "radio" and adding the attribute (name="tab") to the inside of each input tag
then replace the navbar element you have and it's contents with the following:
So before I go into styling and functionality I'll go through one concept which may help your understanding of html:
Now why was this important, well one reason I mention the term sibling and thought it'd be good to throw in a quick explanation in just in case. The other reason is how selectors and styling work, you can't select a child and then style the parent or anything outside the parent. What elements you can style besides the beginning selected element are elements that are inside or underneath. So for the code you can start by selecting div 3 and then get it to style 4, like one possible selector for that is " + " (the plus is for immediate sibling). Now on the other hand there is no way to select div 4 then style div 3
Parent/sibling term explaination
I refer to divs in the code below by the id like "div 1"
Now comes styling and functionality of the tabs with your layout/code in mind
- Let's get this out of the way first, input has a default display input display this is easy to get rid of simply put
input { display: none; }
Just a quick note for the upcoming selectors given as examples, they have this charater "~" which is called the general sibling combinator, anyways it styles any/all siblings that match so just as an quick example "p ~ img" this selector would style all images that come after and are siblings of p.
-
If you want you can style the tab that is selected, an example would be the following selector which deals with the info tab, just replace the "info_tab" with the tab you want to style
:checked ~ [for=info_tab] img {} -
Now the fun part the functionality it just like the previous step just a different path, so here is an example selector below which also will deal with the info tab/box
:checked ~ {}For other content boxs just replace "info_tab" with the tab id you want and "info" with the id of the content box you want.
NOTE: Just in case one important thing to keep in mind is order of css selectors matter
Let me know if anything doesn't make sense, also if you have any questions
everything makes sense, but when it comes to the siblings thing, how can I make these checkboxes work if they're targeting part of the code from vanilla subeta pet pages? (pet_treasure, pet_friends, column_3) EDIT: oh, is it exactly because the input codes are outside all of my divs, making it a sibling of the vanilla coding?
EDIT2: I tried it out, my checkboxes are working, but when I check them nothing happens! x.x i tried doing the display and the visibility codes but neither worked. [updated code]
EDIT3: I fixed that, turns out the code was a bit fussy when trying to style 2 elements at once, but now my vanilla page content won't show, only the box! so I had to change it to:
:focus ~  {visibility:visible;}
:focus ~  {display:inline-block;}
will share the code again after I do some more tinkering.
• • • •
Sorry but that is not possible, I may not have put it in the best way to be understood but my last point in the spoiler was meant to mention why you can't manipulate vanilla subeta profile stuff with checkboxes.
So html you add gets put/placed into the element "" which means you can't manipulate anything outside that element based on your added html which includes all the vanilla,
the input code is outside all your divs to make it a sibling of the top most of your divs added, and they need to be placed above all so they can go and style any of those other added html
(this post was delayed by lag and me getting forcibly logged out)
Edit: The checkboxes didn't work since you changed the structure a bit, the content was inside the element and now it's not so the given selector doesn't work cause of that change to get it to work change from ":checked ~ " to ":checked ~ "
the lag is killing me too over here x.x completely forgot about the limitation x.x can I make the checkboxes act as a link and a checkbox at the same time then? cause the focus is working for my box, and the target was working for the vanilla content so can I mix 'em up?
Edit: okay so after tinkering some more, i've come to the understanding that there's no way I can make focus work with the vanilla classes at all, right? what are my other options to make this content box + the vanilla content to appear at the same time and to be able to close it?
• • • •
I don't think it's possible to be a link and a checkbox but I did some testing to be sure and t my initial thought seems to be right on that
What were the issues you were having with :target and links?
i had to make the + the appear simultaneously when the link was clicked. also I needed a way to close these sections after the link was clicked. the is only to work as a frame for the multiple contents, but i don't know how I could make that code inside the other sections that need it, so I just made a separate div for it. which is why i'm having 21351321 problems rn x'D
• • • •
There is a way for target to get it to make the vanilla you want and the added box to appear at the same time, I'd like to go into detail and give code but I don't have the time, I can do it tonight though, but just to skim what i'm talking about so if you feel up to it you can try what I refer to
An example selectors to make column3 and box appear are ":target" and ":target ~ ". Now for things located under the a trick is to target different element ones you don't plan to use for disappearing like "column_1" and "pet_desc" anyways you target that element and a selector to 'redirect' like ":target ~ "
Sorry if there are mistakes rushed to get this written and posted before getting busy, ill have time later to go through a trick for closing things and go into more detail and such for anything needed
EDIT:
Now i'll go through selectors most i assume you have a handle on but i'll include them for completeness So this will select the content you want for each tab straight forward till the last two, just to remind you this is done because friends and treasure is after so targeting them directly you wouldn't then be able to manipulate/style the html you added which includes the content box:
It's separated just to keep things a bit more clean but the next selectors will be to make the box appear for each tab selected, for this to fully work please move the element below any added element that is gonna be a target so it can appear in those cases as well
Now this most likely need you to fiddle with the z-indexes to get things just to your liking for this trick i'll go into for closing a content box, First a new element needs to be added, needs to be below the target elements so at the very bottom should be a good place also not insides any other added element
Now this is not all that is needed as you can see this in inactive so it doesn't do anything currently but add the following css/styling as well which should activate it when any content box is showing it's should look familiar since the selectors are quite the same as the box
Now with that implemented this should allow you to close the box any where the newly added element is placed on top. If you need explanation on any of this or something is going wrong just let me know. If there are additional problems/issues please let me know as well. Also in most cases I can figure things out by looking at the pet profile.
SPOILER (click to toggle)
Here is a new nav bar code that is based on links again should have the most up to date sections you want

:target, :target, :target, :target, :target ~ , :target ~ { ... }:target ~ , :target ~ , :target ~ , :target ~ , :target ~ , :target { ... }
Now for styling this new element
 {
position: absolute;
left: 0px;
top: 0px;
width: 100vw;
height: 100 vh;
display: none;
z-index: 1;
}:target ~ , :target ~ , :target ~ , :target ~ , :target ~ , :target { display: initial; }